The Image Editor can alter the size of an uploaded image. Please note that this will change the physical size of the image on the server. Therefore, resizing a large image to a smaller size provides better performance than simply changing the size of the image using the Image Properties. The Image Editor can also trim away unwanted edges of the image, referred to as "cropping" the image.
1. Cropping an Image
An image can be cropped in order to focus on a specific area in the image or to achieve a special effect. To crop an image, select the desired area and select the Crop toolbar button.
- Open the image from the Media Library.
-
Select the desired portion of the image by clicking and holding the left
mouse button, while dragging the mouse. A selection rectangle will
form.

- When the desired area has been selected, release the left mouse button
-
Click the Crop toolbar button
 . The Image
Editor will delete all of the image except the area inside the selection
rectangle.
. The Image
Editor will delete all of the image except the area inside the selection
rectangle.

NOTE: To select an area of the image, the mouse must start the drag inside the area of the image.
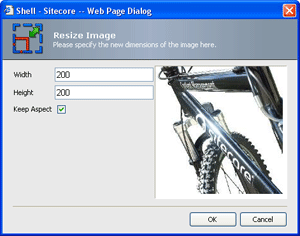
2. Resizing an Image
An image can be resized in the Image Editor and thereby avoid repeated resizing when using the image. This will resize the physical size in the Media Library, which may be appropriate if the uploaded image is larger than desired or if some special proportions are needed.
- Open the image from the Media Library.
-
Click the Resize toolbar button
 which
opens the Resize dialog box.
which
opens the Resize dialog box.
-
Type in the new dimensions (either width or height).
If the Keep Aspect box is marked, the dimensions according to the new dimension value are automatically calculated, as the box toggles whether the Image Editor should automatically maintain the width/height ratio.If you want to change the dimension, remove the mark from the Keep Aspect box. This allows for stretching the image according to the values assigned in weight and height.
-
Click OK and Save the image.
The image appears in the Image Editor with the new dimensions.